
TOPIC: PRACTICAL – WAYS OF CLEANING AND BEAUTIFYING THE SURROUNDINGS OF THE HOME
A: TEACHING AND LEARNING MATERIALS
- Broom.
- Dustpan.
- Waste bin.
- Small rake.
- Mop.
- Bucket.
- Clean water.
- Cleaning cloth.
- Dry leaves.
- Clean pieces of waste paper for demonstration.
- Picture cards showing cleaning activities.
- Coloured paper.
- Crayons or coloured pencils.
- Child-safe scissors for teacher-supervised paper work.
- Pupils’ writing books and pencils.
B: REFERENCE MATERIALS
- Scheme of work.
- Recommended Home Economics textbook for Primary 1.
- Online educational resources.
C: PREVIOUS KNOWLEDGE
The pupils have learnt the meaning and examples of dirt. They can identify dust, pieces of paper, dry leaves, food crumbs, sand, mud and wrappers. They have also learnt simple cleaning methods such as picking, sweeping and dusting.
Previous lesson: Primary 1 Home Economics Third Term Week 4
D: PERFORMANCE OBJECTIVES
By the end of the lesson, pupils should be able to:
- Mention different ways of cleaning the surroundings of the home.
- Identify simple tools used for cleaning the surroundings.
- Match cleaning tools with their uses.
- Demonstrate safe picking and sweeping.
- Demonstrate how to gather dry leaves.
- State the correct way of disposing of rubbish.
- Mention safety rules to follow during cleaning.
- Explain why the home surroundings should be kept clean.
- Mention simple ways of making the home or classroom surroundings attractive.
- Take part in a simple supervised cleaning and beautification activity.
E: CONTENT
Keeping Our Surroundings Clean
The surroundings of the home are the places around the house.
They may include:
- Compound.
- Walkway.
- Backyard.
- Garden.
- Front of the house.
These places should be kept clean and neat.
A clean surrounding makes the home look pleasant.
Ways of Cleaning the Surroundings
We can clean our surroundings in different ways.
Simple ways include:
- Picking litter.
- Sweeping.
- Gathering dry leaves.
- Using a dustpan.
- Putting rubbish in a waste bin.
- Mopping suitable floor areas.
- Washing suitable surfaces when necessary.
Cleaning Methods and Their Uses
|
Cleaning Method |
What We Do |
|---|---|
|
Picking |
Collect safe pieces of litter |
|
Sweeping |
Gather dust, sand and light dirt |
|
Raking |
Gather dry leaves outdoors |
|
Mopping |
Clean suitable floors |
|
Washing |
Remove dirt from washable surfaces |
|
Waste disposal |
Put rubbish in the correct bin |
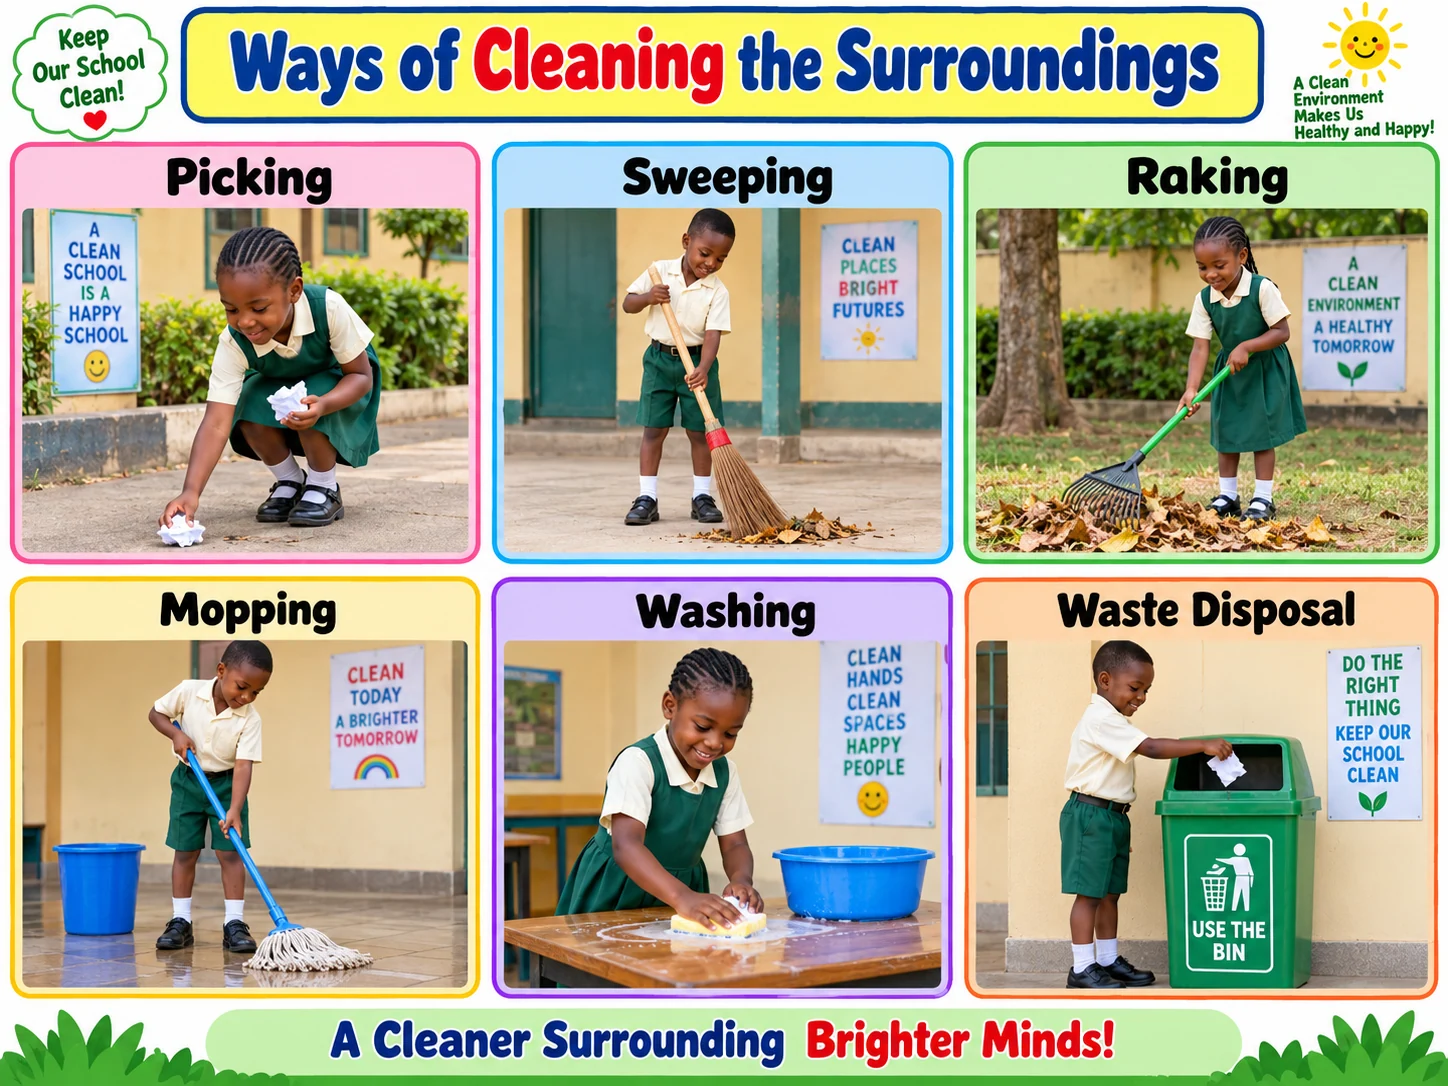
1. Picking Litter
Picking means collecting safe pieces of rubbish from the ground.
Examples of things that may be picked during a supervised lesson are:
- Clean pieces of paper.
- Empty safe wrappers.
- Dry leaves.
After picking them, they should be put in a waste bin.
Things Children Should Not Pick
Pupils should not pick:
- Broken glass.
- Needles.
- Razor blades.
- Sharp metal.
- Unknown chemicals.
- Dirty medical waste.
If any dangerous object is seen, tell an adult.
2. Sweeping
Sweeping means using a broom to gather dirt together.
We may sweep:
- The compound.
- Walkway.
- Classroom.
- Veranda.
- Other safe areas.
Materials for Sweeping
We need:
- Broom.
- Dustpan.
- Waste bin.
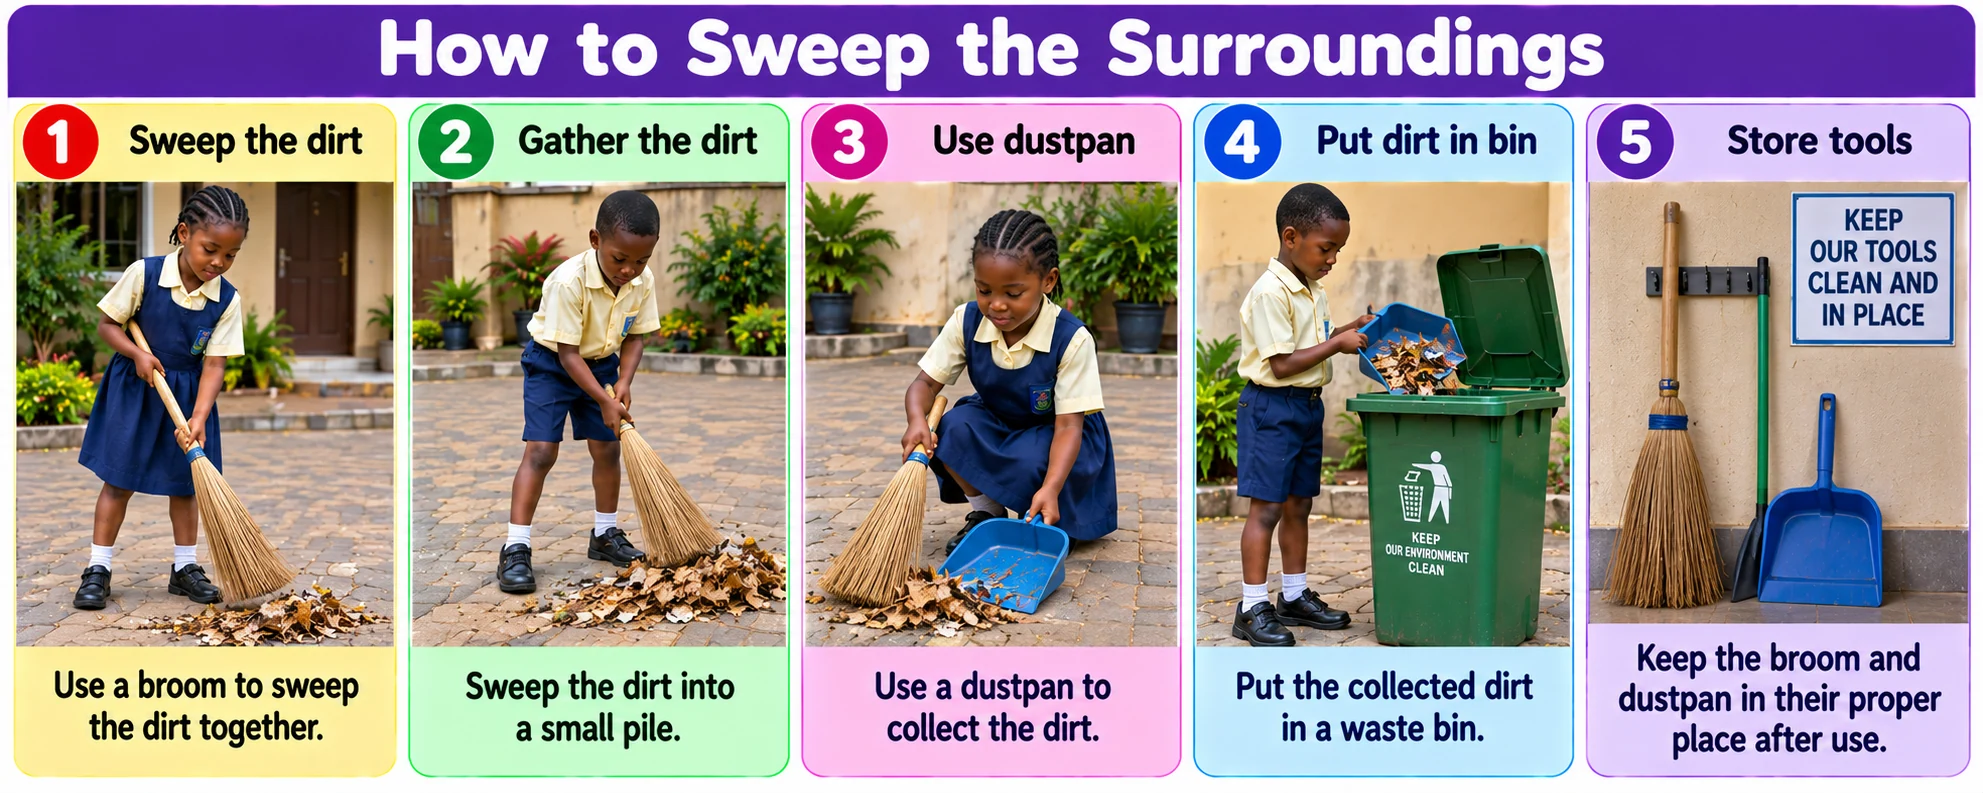
How to Sweep
- Hold the broom properly.
- Start from one part of the area.
- Sweep the dirt together.
- Make a small pile.
- Collect the dirt with a dustpan.
- Put it in the waste bin.
- Keep the broom and dustpan properly after use.
3. Gathering Dry Leaves
Trees may drop dry leaves around the compound.
Dry leaves can make the surroundings untidy.
They may be gathered with:
- Broom.
- Small rake.
- Hands protected appropriately during a supervised activity.
How to Gather Dry Leaves
- Gather the leaves into one place.
- Make a small pile.
- Collect them safely.
- Put them in the proper waste container.
Children should not burn leaves or rubbish.
Fire should be handled only by responsible adults where permitted.
4. Using a Dustpan
A dustpan is used for collecting dirt after sweeping.
The correct steps are:
- Sweep the dirt into a pile.
- Place the dustpan near the pile.
- Sweep the dirt into the dustpan.
- Carry it carefully to the waste bin.
- Empty it into the bin.
The dirt should not be thrown back onto the ground.
5. Mopping
Mopping means cleaning a suitable floor with a mop.
Mopping may be used on:
- Veranda.
- Tiled walkway.
- Classroom floor.
- Other washable floor areas.
Simple Mopping Steps
- Prepare clean water.
- Wet the mop.
- Squeeze out too much water where necessary.
- Move the mop gently across the floor.
- Rinse it when dirty.
- Leave the floor to dry.
Young pupils should practise only on a safe, clean demonstration area under supervision.
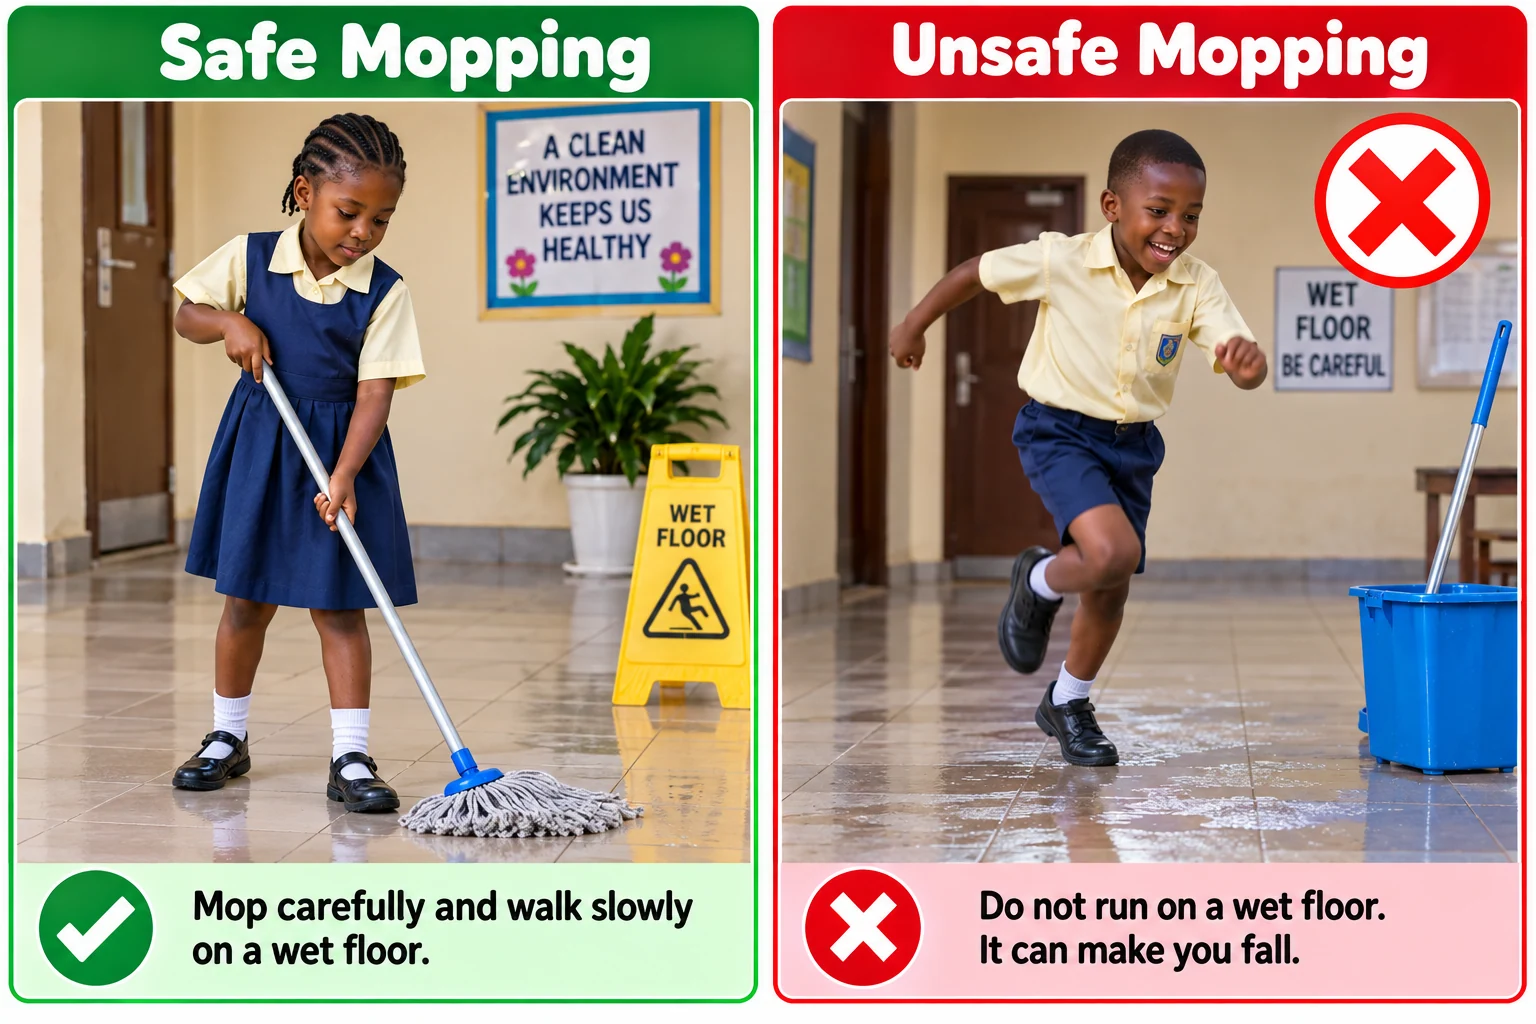
Wet-Floor Safety
A wet floor can be slippery.
Pupils should:
- Walk carefully.
- Avoid running.
- Warn others when the floor is wet.
- Allow the floor to dry.
6. Putting Rubbish in the Waste Bin
Rubbish should be put inside a waste bin.
We should not:
- Throw rubbish on the ground.
- Throw waste through the window.
- Hide rubbish under furniture.
- Leave swept dirt in the walkway.
Correct Waste Disposal
SEE RUBBISH
↓
PICK IT SAFELY
↓
USE THE BIN
↓
KEEP AREA CLEAN
A clean environment begins when everyone puts waste in the proper place.
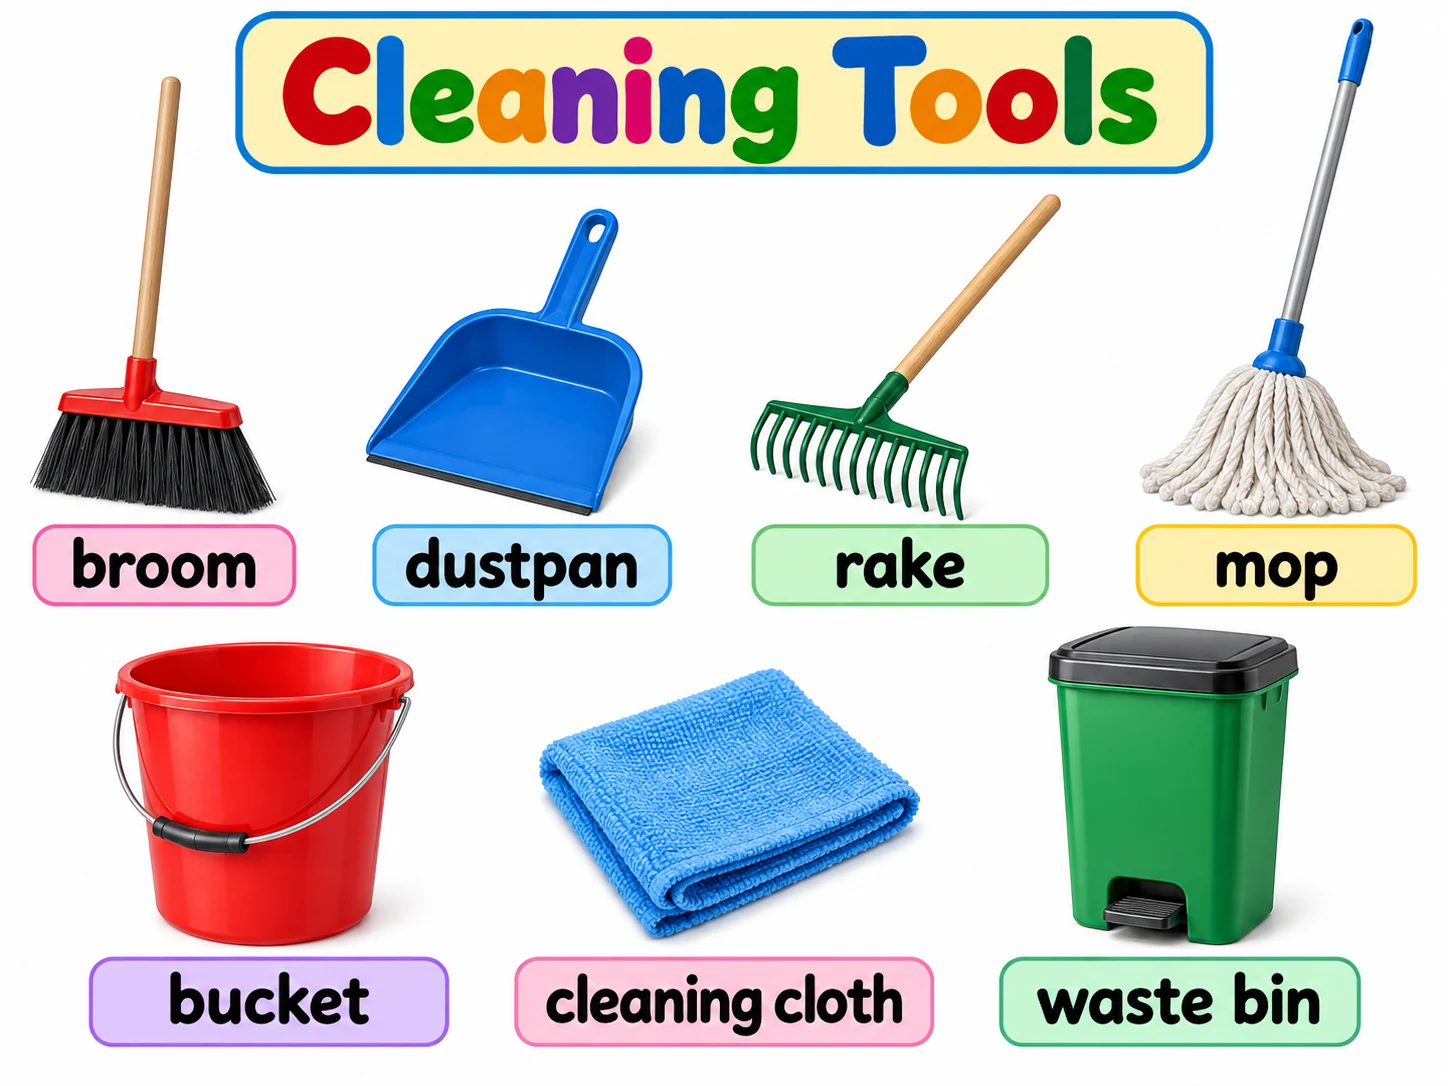
Cleaning Tools and Their Uses
|
Cleaning Tool |
Use |
|---|---|
|
Broom |
Sweeping |
|
Dustpan |
Collecting swept dirt |
|
Rake |
Gathering dry leaves |
|
Mop |
Cleaning suitable floors |
|
Bucket |
Holding water |
|
Cleaning cloth |
Wiping surfaces |
|
Waste bin |
Holding rubbish |
Caring for Cleaning Tools
Cleaning tools should also be cared for.
After cleaning:
- Remove dirt from the broom.
- Empty the dustpan.
- Rinse a dirty mop.
- Empty the bucket.
- Allow wet tools to dry.
- Keep tools in their proper places.
Why We Care for Cleaning Tools
We care for them so that they:
- Stay clean.
- Last longer.
- Are easy to find.
- Are ready for the next cleaning activity.
Practical Cleaning Activity
The teacher should prepare a safe practice area.
The teacher may scatter small amounts of:
- Clean pieces of paper.
- Dry leaves.
- Clean sand.
Group One – Picking
Pupils pick safe pieces of paper and put them into a waste bin.
Group Two – Sweeping
Pupils sweep a small safe area under the teacher’s supervision.
Group Three – Gathering Leaves
Pupils gather dry leaves into a pile.
Group Four – Waste Disposal
Pupils use a dustpan and put the collected dirt into the proper bin.
Group Five – Arrangement
Pupils help return the cleaning tools to their proper places.
Safety During Cleaning
Cleaning should be done carefully.
Pupils should:
- Follow the teacher’s instructions.
- Use only safe cleaning tools.
- Avoid running while cleaning.
- Avoid throwing dirt at other pupils.
- Keep the broom away from another person’s face.
- Avoid dangerous objects.
- Avoid drains and unsafe areas.
- Avoid strong cleaning chemicals.
- Wash the hands after cleaning.
- Tell an adult when something dangerous is seen.
Making the Home Surroundings Beautiful
Cleaning makes a place neat.
We can also make our surroundings attractive.
Beautifying means making a place look pleasant and beautiful.
Simple ways include:
- Arranging the surroundings neatly.
- Growing flowers.
- Keeping plants properly.
- Removing litter.
- Decorating suitable areas with simple artwork.
Clean Before You Decorate
A place should first be:
- Clean.
- Neat.
- Properly arranged.
Then it can be decorated.
A dirty place does not become truly neat just because decorations are added.
Simple Paper Decoration
Paper may be used to make simple decorations.
The teacher may guide pupils to make:
- Paper flowers.
- Simple coloured shapes.
- Paper chains.
- Simple wall decorations.
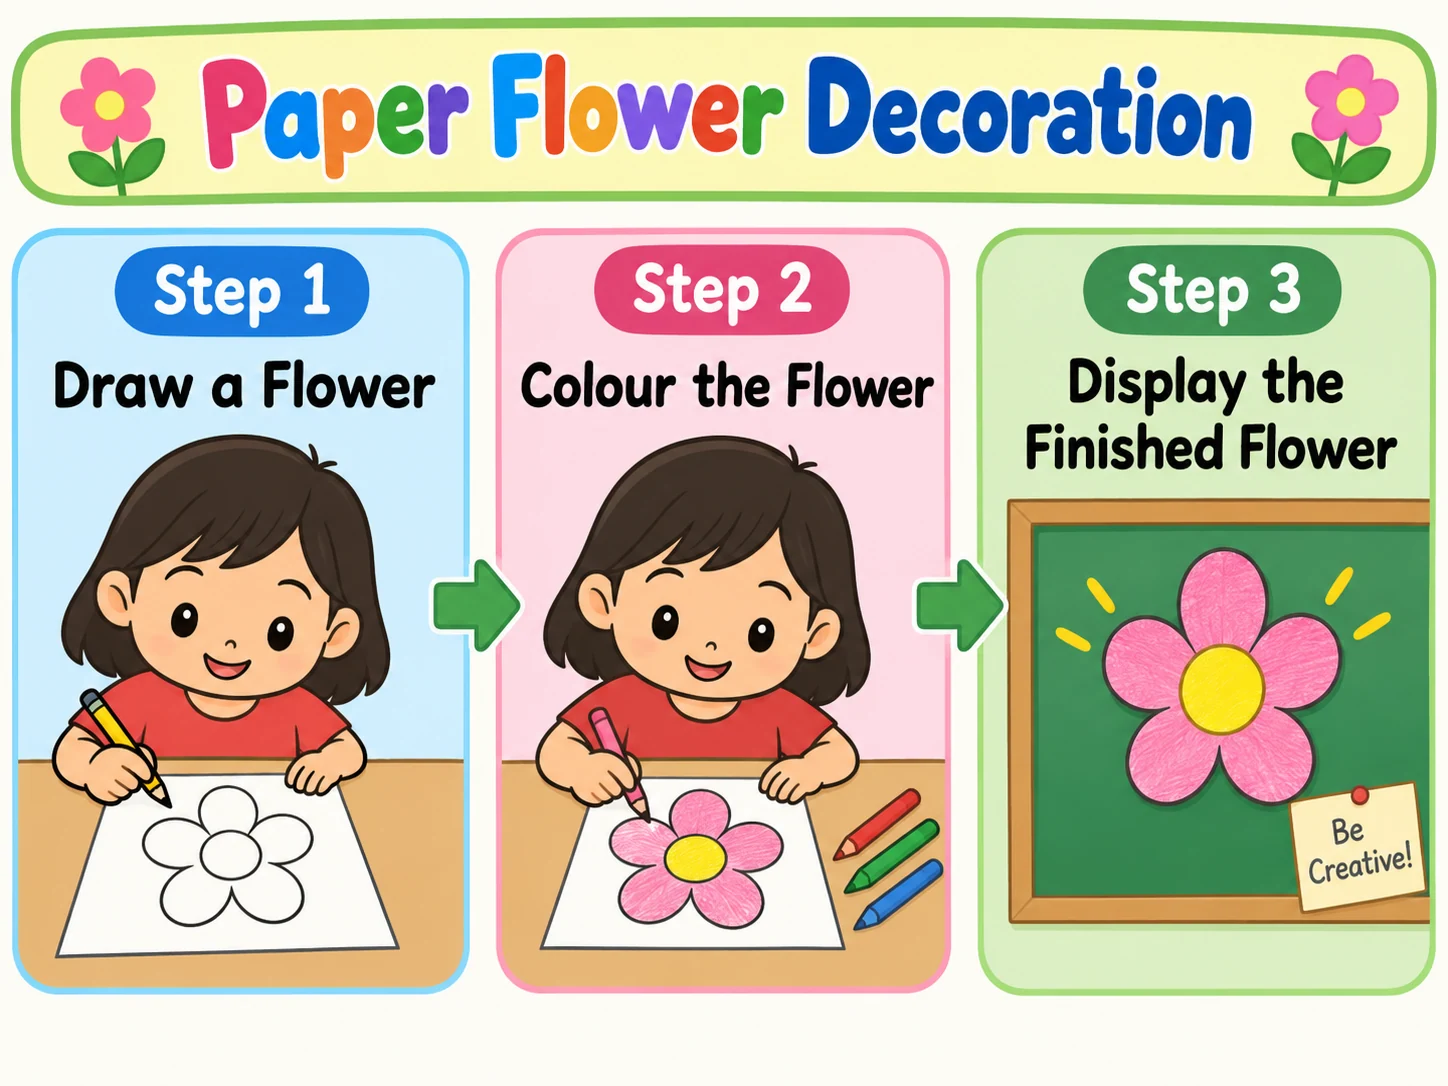
Simple Paper-Flower Activity
The teacher may:
- Give pupils clean coloured paper.
- Show them a simple flower shape.
- Allow them to colour or decorate it.
- Assist with any cutting that is needed.
- Display suitable finished work in the classroom.
Young pupils should use scissors only with close supervision and only when appropriate.
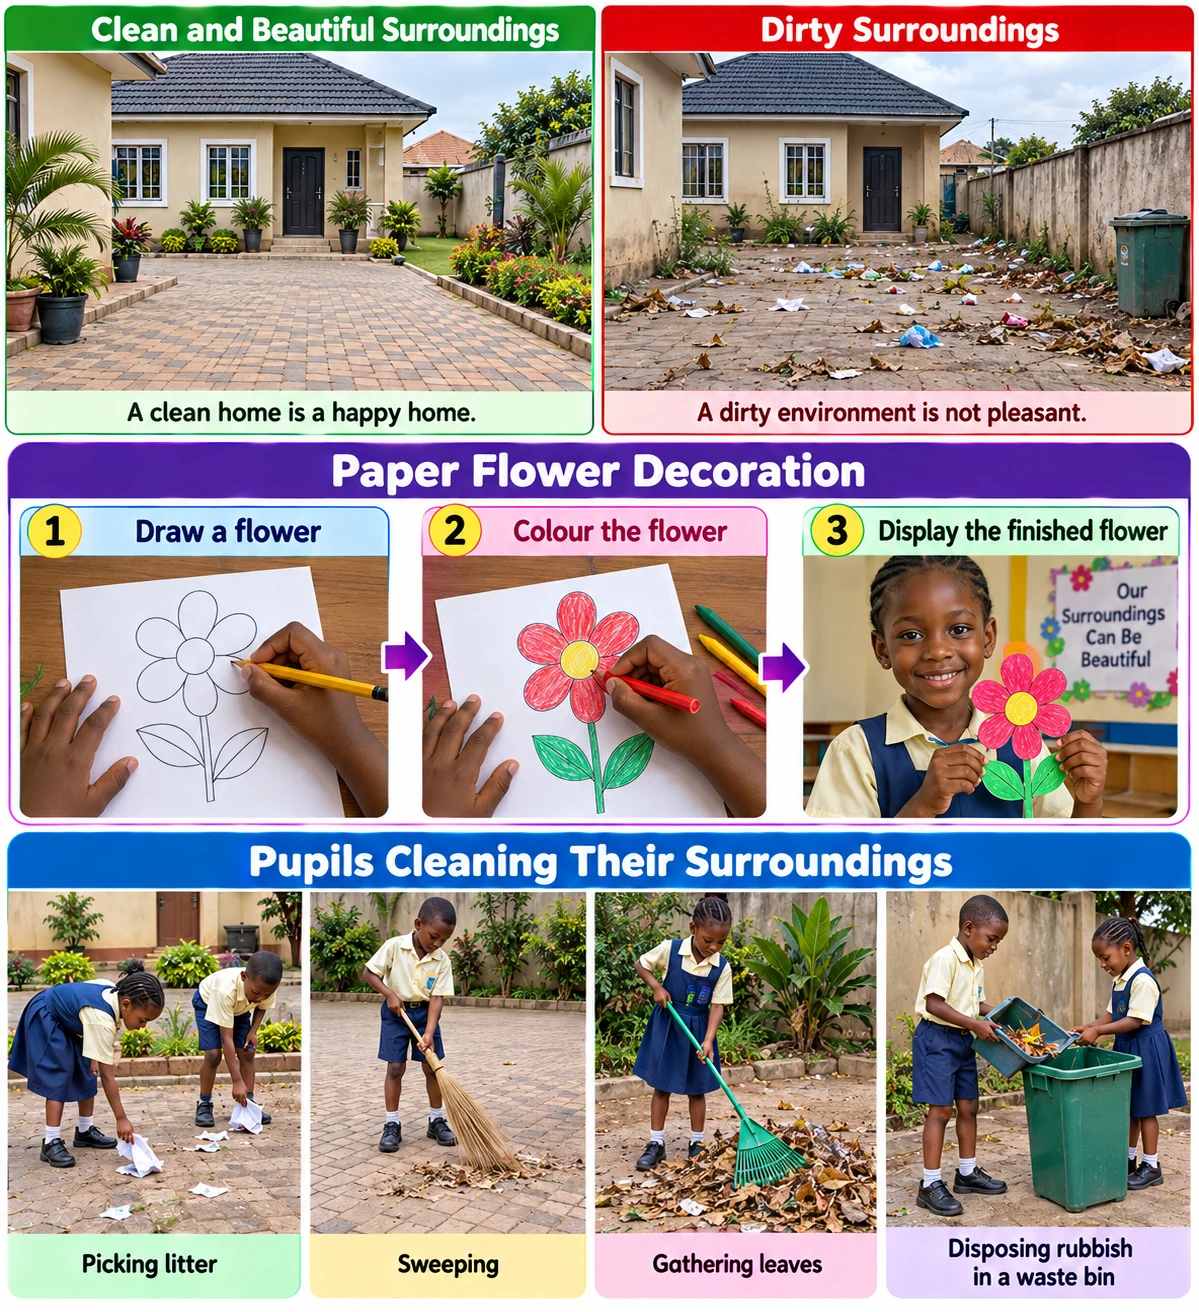
Clean and Beautiful Surroundings
|
Clean and Beautiful Surroundings |
Dirty Surroundings |
|---|---|
|
Rubbish is in the bin |
Rubbish is scattered |
|
Walkway is clear |
Walkway has litter |
|
Leaves are gathered |
Leaves are everywhere |
|
Flowers are cared for |
Plants are neglected |
|
Cleaning tools are stored |
Tools are scattered |
|
Area looks neat |
Area looks untidy |
Why We Should Keep the Surroundings Clean
Clean surroundings:
- Make the home look neat.
- Make the area pleasant.
- Reduce dirt and litter.
- Help keep walkways clear.
- Reduce bad smells from rubbish.
- Help us develop good habits.
- Give us a comfortable place to live and play.
Daily Cleanliness Habits
A pupil can help every day by:
- Putting rubbish in the bin.
- Putting toys away.
- Keeping books properly.
- Picking safe paper litter.
- Helping to sweep when asked.
- Keeping the walkway clear.
- Avoiding littering.
- Reporting dangerous waste to an adult.
Simple Rule to Remember
PICK
↓
SWEEP
↓
COLLECT
↓
BIN IT
↓
KEEP IT NEAT
F: LESSON PRESENTATION
F1: Teachers’ Activities
- Revises Week Four work on dirt and cleaning methods.
- Shows pupils pictures of clean and dirty surroundings.
- Asks pupils to identify dirt in the pictures.
- Displays broom, dustpan, rake, mop and waste bin.
- Explains the use of each cleaning tool.
- Demonstrates safe picking of litter.
- Demonstrates the correct way of sweeping.
- Shows pupils how to use a dustpan.
- Demonstrates gathering dry leaves.
- Demonstrates simple mopping in a clean practice area.
- Divides pupils into supervised groups for practical activities.
- Explains proper waste disposal.
- Discusses cleaning safety rules.
- Introduces simple ways of beautifying the home or classroom.
- Guides pupils in a simple paper-decoration activity.
- Asks oral questions and corrects pupils where necessary.
F2: Pupils’ Activities
- Recall types of dirt learnt in Week Four.
- Identify cleaning tools.
- State the uses of cleaning tools.
- Demonstrate picking safe litter.
- Practise sweeping in a supervised area.
- Practise using a dustpan.
- Gather dry leaves safely.
- Put practice rubbish into a waste bin.
- Mention cleaning-safety rules.
- Help return cleaning tools to their proper places.
- Take part in a simple paper-decoration activity.
- Mention ways of making their surroundings clean and attractive.
- Answer the teacher’s questions.
G: CONCLUSION
The teacher revises the different ways of cleaning the surroundings of the home.
The teacher reminds pupils that picking, sweeping, gathering leaves, mopping and proper waste disposal help to keep the home and school neat.
The teacher also explains that a clean environment can be made more attractive through proper arrangement, flowers and simple decorations.
Pupils are encouraged to take part only in safe and age-appropriate cleaning activities and to report sharp, dangerous or unknown waste to an adult.
H: EVALUATION GUIDE
Pupils should be able to answer the following questions:
- Mention five ways of cleaning the surroundings.
- What do we use a broom for?
- What is a dustpan used for?
- What do we use a rake for?
- What is a mop used for?
- Where should rubbish be put?
- Mention four steps in sweeping an area properly.
- Mention three things that may be picked during a safe cleaning exercise.
- Mention three dangerous objects pupils should not pick.
- Why should we not run on a wet floor?
- Mention four cleaning tools.
- Mention three ways of caring for cleaning tools.
- What does beautifying mean?
- Mention three ways of making the surroundings attractive.
- Why should we clean a place before decorating it?
- Mention four safety rules to follow while cleaning.
- Complete: Pick the rubbish, sweep the dirt and put the waste in the ________.
- Mention three reasons for keeping the home surroundings clean.